


BLOG:
I have grown so much. As a person and as I photographer. these are some helpful hints and tricks that I learned/ am in the process of learning that has helped me in my photography field.
My goal is to write a new post at least once a week and grow with different topics.
Want to talk more about personal questions or help? Please email me!
[email protected]
WHAT EDITING SOFTWARE TO USE:
The editing process of photography is just as important as the photoshoot itself. That is why it is so important to buy and use a software that is comfortable for you. I personally have the most experience with Adobe Lightroom and Adobe Photoshop. I love both of these programs because they are filled with different tricks and short-cuts to edit your photos. I use both of the programs but I use them for different things. Adobe Lightroom is my primary editing source because of its famous catalog service. Lightroom has this feature that allows you to store your photos into a catalog so that you can stay organized. The catalogs take copies of the photos so that the originals aren't lost! What I love about Adobe Lightroom is the ability to create pre-sets that you can use and save to just throw onto any and every photo. Adobe Lightroom is interchangeable to Adobe Photoshop which is a program that really lets you alter images. For me, photoshop took me a little while to really get the hang of just because there are a lot of different tools to learn and you can essentially do almost anything! My only recommendation is to always create two background layers of your original image so that you do not mess anything up!
The editing process of photography is just as important as the photoshoot itself. That is why it is so important to buy and use a software that is comfortable for you. I personally have the most experience with Adobe Lightroom and Adobe Photoshop. I love both of these programs because they are filled with different tricks and short-cuts to edit your photos. I use both of the programs but I use them for different things. Adobe Lightroom is my primary editing source because of its famous catalog service. Lightroom has this feature that allows you to store your photos into a catalog so that you can stay organized. The catalogs take copies of the photos so that the originals aren't lost! What I love about Adobe Lightroom is the ability to create pre-sets that you can use and save to just throw onto any and every photo. Adobe Lightroom is interchangeable to Adobe Photoshop which is a program that really lets you alter images. For me, photoshop took me a little while to really get the hang of just because there are a lot of different tools to learn and you can essentially do almost anything! My only recommendation is to always create two background layers of your original image so that you do not mess anything up!
|
THE HARDEST PROJECT I HAD DURING MY PHOTOGRAPHY TWO UNIVERSITY COURSE: HDR
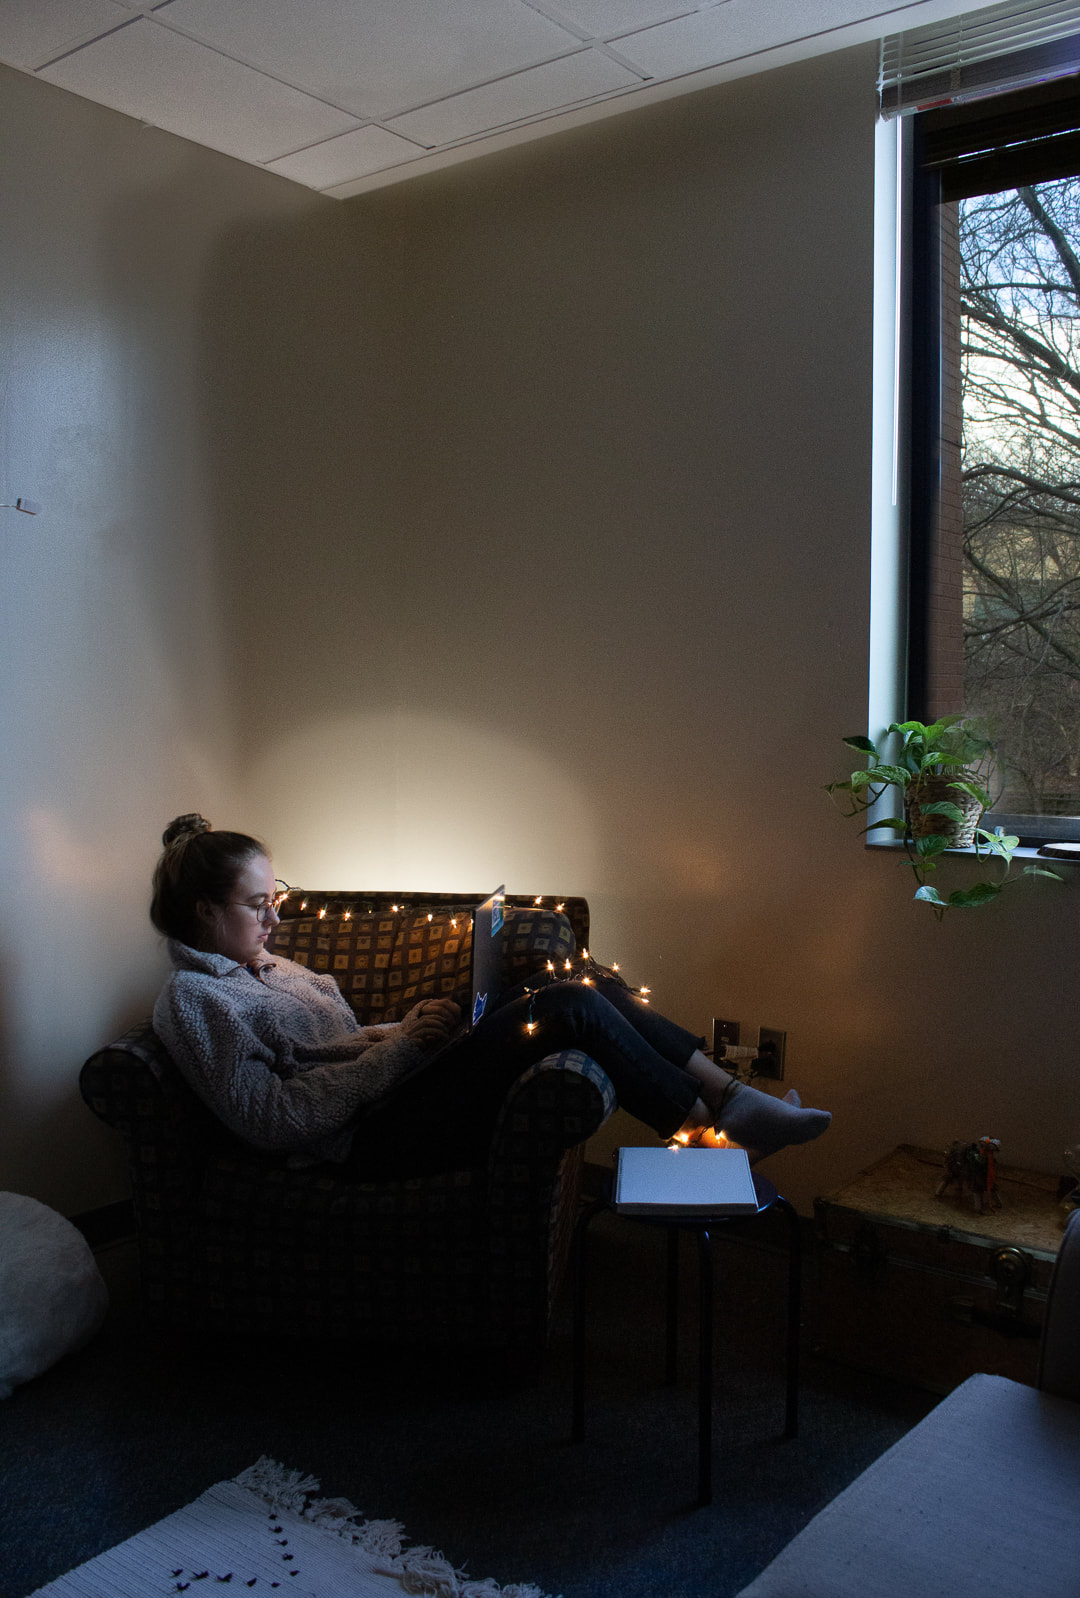
HDR. Those three letters bring back all of the memories of endless hours shooting, re-shooting, editing, re-shooting again, to editing, re-shooting three more times before finally editing for the final results. HDR stands for High-Dynamic-Range which is a technique that creates a greater dynamic range of luminosity than what is possible with standard digital imaging techniques. To put this into terms I wish I heard on the first day of this assignment, it is a compilation of several images layered on top of each other that are shot at different exposures to create the "perfect" shot. For example, the photo on the left was a creation for my HDR project. This final photo is compiled from about four images. 1 photo had the exposure set so that my model was entirely lit-up. The 2nd photo had an exposure set so that the lamp that I set behind the chair was bright but the room was not. The 3rd photo had an exposure that encompassed the room in the natural window light. And the 4th image was an exposure to the outside so that the tree limbs could be seen. As you can tell, this is not a perfect image. The plant that is sitting on the windowsill has a blurry, almost ghost-like effect. Once you take the amount of images you need for each item(s) you want to be perfectly exposed, you essentially aligning the photos as layers in photoshop and painting away at the spots you want to be shown and painting on the parts you want to be covered by one of the (4) images you take. For example, looking at my model, there was one image where her entire body is perfectly exposed and her legs and feet had a natural light cast. I decided to cover up that exposure and have the image that had a darker exposure on her legs and feet to create a dramatic effect on the image. If I had the opportunity to re-shoot, I would like to take more photos of the window. I struggled with masking and that is why the plant looks so funky! I chose to talk about this assignment because it was honestly the hardest assignment I learned. I found it hard to take multiple photos with different exposures because while shooting I think that I have taken the best shot but when you are editing for HDR, you realize that you should have went just one more F-stop down so that the flow of the final image was more "natural" or "dramatic" whatever tone you're aiming for. With that being said, I have to say that this has been one of the best tools I was taught. After this project, I was taking every photo with multiple frames playing with different exposures incase I got to the editing process and realized I wanted more of the outside to show through within the room, or have a model's face a little bit more exposed than the set lights were. Taking commission photos with this technique has also made my images more professional. There is a clean look to having all of the "right" things exposed. I would 100% recommend learning this tool and having fun with what you can create with this! (maybe you won't have to re-shoot six times to get some final images!) |
DO YOU FEEL LIKE YOU'RE IN A PHOTO. FUNK?! I HAVE THE SECRET TOOL TO HELP INSPIRATION!
There has been so many times that I have been in the "photo. funk." For me, this funk means that I: can't think of a series or concept I would like to work on, I feel un-inspired, and/or I feel like I am pushing my photography drive away in order to focus on other things. I still feel a sense of guilt that comes with these feelings because photography has always been my passion, and frankly always will be, but it is always hard to come up with new ideas and push yourself to create something new. Personally, I am someone who puts pressure on myself to continue to create pieces that I hope will shape me into a "better" photographer. I love conceptual pieces that leave open-ended hints for people to read into. Throughout the years that I have experienced the "photo. funk," I have been introduced to some things that have given me so much inspiration to keep creating.
#1: The Random Prompt Generator website.
This is exactly what it sounds like. It is a website that creates prompts for all artists, not just specifically photographers, and gives ideas to work on. It is so easy, there is a pull-down option that has you choose "elaborate, simple, or somewhere in-between simple and elaborate." Then you choose if you want "1, 5, or 10" prompts. I personally usually choose an "elaborate, 1" prompt so that it challenges me to get very specific.
#2: PhotoTalks on Youtube.
If you enjoy watching YouTube or videos in general, this channel on YouTube is the spot for you! They are videos of different photographers and what they do. If you are looking for a photographer who focuses on color photography, you can find one and they tell their story and how their process is. I enjoy these videos because it inspires me to keep creating images that people want to know the process of how I work.
#3: Actively keeping up with the website, LENSCRATCH.
This is an AMAZING source of inspiration because it is basically a photographers paradise. LENSCRATCH is a photography journal that Aline Smithson (an amazing photographer, you should definitely check out her website and work) created to showcase contemporary photographers. The journal is extremely active and there are new spotlights every day! You are able to submit your own artwork to them, which helps new photographers get published. If you keep up with the daily posts, you are able to learn more about other photographers and what their collections are. It is inspiring to learn about a photographer that has similar interests as you but captures their concepts differently.
I only gave three examples, but there are so many more! Everyone is different and honestly, I have said this before but it is perfectly fine to take an artistic break. I have found that if I take a few days, or weeks off from shooting, there is almost a brain explosion of ideas that I get and it boosts my serotonin through the roof! Sometimes all I need is a long run to help get some ideas flowing, and other days I need these tools to help inspire me to push my creative ideas. Do you have any tricks that helps you?
day three: ocean eyes
day two: so many details
P.S- this challenge is one month, and I am keeping it updated on my projects page!! |
day five: technicolor
day ten: touch the sky
|
CHALLENGING YOURSELF
sometimes I feel stuck with ideas. I either have too many ideas to sort out in my head and plan, or it's like there isn't anything even up there to begin with! it's frustrating when you're hit with this. I was lucky enough, and I have mentioned this before, to have had such a huge photography role model while shaping my style during my senior year of high school. this teacher introduced me to another local high school's photography teacher who does these "photo challenges" in the summer. I first heard about this last summer, and it has warped how i plan for my shots! This teacher posts the link to a song up at midnight, giving you less than 24 hours to plan!!!!! This is the greatest thing about the challenge! Because, if you’re like me, all you do is think about different photoshoots you can do and keep planning for the next. this challenge keeps you from doing that- given a restricting time frame. The song is the prompt for the day, you can choose how you incorporate it, but it has to be the inspiration for your photo. For example, day three was the song “ocean eyes” by Billie Eilish. Rather than use the title of the song as my inspiration, I used the line, “ i’ve never fallen from quite this high…” When you can see with the “technicolor” song for day five, I went with exactly what the song was named. The most frustrating thing about challenges like this are the excuses to why you're not posting or shooting. There were three days where I worked open to close at my job and was just tired. for me, my photography process is very important to me. challenges like these allow me to remember that shooting everyday does not have to be the most perfect photograph! looking at both, day two and day ten, I was hesitant to post these on my instagram. day two is not a normal shot for what I like to focus my photography on and it led to me feeling insecure about sharing. day ten was me getting more confident in shooting in the moment for the challenge and relating it back to my style. I think it is so important to challenge yourself in all forms of art. If you're interested in experimenting with this challenge idea, I would ask a family member or friend to create a playlist for as many days as you want (30 days ideally) and use that playlist... in the order that it was made... to shoot daily! exercise your creativity and your art. you will see your portfolio grow as well as your skill in just one month.( It also gives you something to look forward to each day) |
ONE OF THE BEST GIFTS FOR A PHOTOGRAPHER:
one of the best gifts for a photographer is a tripod. when I was first getting into photography and learning about it, I didn't understand the importance of owning a tripod until it was gifted to me for Christmas two years ago. I did not take a lot of photos where I thought I would need one, so I never really thought about how important it was for your shots. to face the facts, people subconsciously shake. sometimes, photos are impacted from natural body shakes! I was shooting my high school's production of Macbeth during my senior year of high school and I forgot a tripod for my first day of photographing the production!! luckily, i attended the show for three days and made up for the first day. while taking photos, I didn't realize how crooked or blurry my photos were until I was editing that night. so, it's important to bring a tripod so you don't realize this mistake and not have safety days after to make up. Whenever you are shooting professionally for a company, business, or event like a play or dance recital, I would recommend bringing a tripod! the wonderful thing about them is that it is incredibly easy to just detach from the tripod and reattach if you are running around! once you use a tripod for some of your shots, you will realize the difference a still camera makes. no more editing to make sure your photo is straight, no more blurry images, no more worrying! your tripod doesn't even have to cost you an arm and a leg! i have seen them at Walmart for $10 before. I am not sure if this is the case for everywhere, but my university also rents out tripods at our library. I was not able to take my tripod to school with me because I just didn't have enough space and when I had to take headshots for my internship, I knew I needed one. I took a chance and went to my library and found out that they had all different kinds to rent out!! so, if you are not sure if a tripod is the best purchase for you (which it is. I promise you it is so worth it) then I would check out your local library or school library to see if they rent them out! the beauty of owning one of these bad boys is that you don't have to worry about a return date or working around when they are available to be rented out! you can just reach in your camera bag and pull your tripod out!
one of the best gifts for a photographer is a tripod. when I was first getting into photography and learning about it, I didn't understand the importance of owning a tripod until it was gifted to me for Christmas two years ago. I did not take a lot of photos where I thought I would need one, so I never really thought about how important it was for your shots. to face the facts, people subconsciously shake. sometimes, photos are impacted from natural body shakes! I was shooting my high school's production of Macbeth during my senior year of high school and I forgot a tripod for my first day of photographing the production!! luckily, i attended the show for three days and made up for the first day. while taking photos, I didn't realize how crooked or blurry my photos were until I was editing that night. so, it's important to bring a tripod so you don't realize this mistake and not have safety days after to make up. Whenever you are shooting professionally for a company, business, or event like a play or dance recital, I would recommend bringing a tripod! the wonderful thing about them is that it is incredibly easy to just detach from the tripod and reattach if you are running around! once you use a tripod for some of your shots, you will realize the difference a still camera makes. no more editing to make sure your photo is straight, no more blurry images, no more worrying! your tripod doesn't even have to cost you an arm and a leg! i have seen them at Walmart for $10 before. I am not sure if this is the case for everywhere, but my university also rents out tripods at our library. I was not able to take my tripod to school with me because I just didn't have enough space and when I had to take headshots for my internship, I knew I needed one. I took a chance and went to my library and found out that they had all different kinds to rent out!! so, if you are not sure if a tripod is the best purchase for you (which it is. I promise you it is so worth it) then I would check out your local library or school library to see if they rent them out! the beauty of owning one of these bad boys is that you don't have to worry about a return date or working around when they are available to be rented out! you can just reach in your camera bag and pull your tripod out!
left photo
|
right photo
|
THE BEAUTY BEHIND ANGLES:
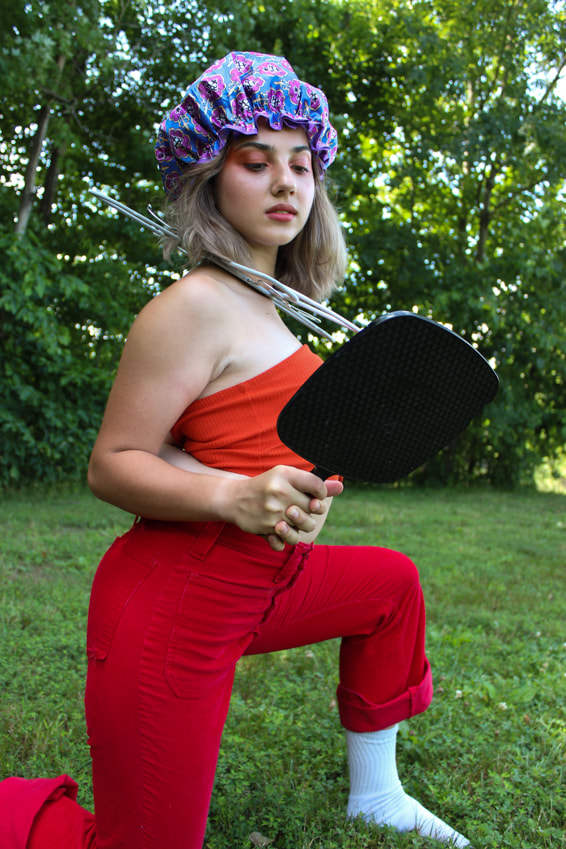
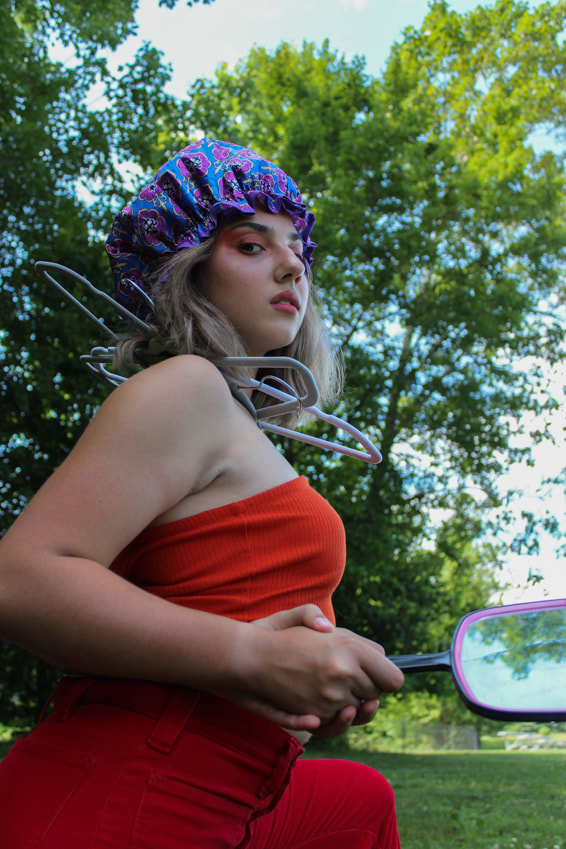
this is the aspect of photography that I appreciate and love so much. angles altar everything about a photograph: the tone, purpose, and energy. I chose to add two photos to show you a model that is in the exact same pose for both but my angles were different. The photo on the left shows the straight on view of the model and you can tell that there isn't much depth or leading lines to the subject. The photo on the right, however, shows a different tone and story. I am laying on the ground for this one to create a power figure within the model. having her look down at the camera gives a tone that is much different than the left. the left image gives off more of an insecure tone because she is avoiding eye contact with the lens. What I love about the photo on the right is the way that the hangers around her neck add leading lines to the main focus... her face. I like to add a lot of detail in my shot to keep the viewer looking at my image. in the left, the leg that is up is more of a distracting detail for the shot because the sock is not in the color scheme. I felt as though the hue of white was too strong, taking away from her. The angle of the right photo gives all of the detail I want: the second hand peaking over the dominate hand holding the mirror, the hangers around her neck, and her eyes. since you will already be planning your shots, the change of angles will only improve your work! you can learn what angles you tend to shoot in and what kind of depth is added when you move the camera even just an inch! |
KEEPING YOUR DUCKS IN A ROW:
This is a skill that I have learned the importance of, the hard way. if you're like me, you have your photoshoot, upload immediately to your computer, edit the photos, and then leave the photos on your SD card. How did I start this terrible habit? I think it was because I was shooting so often and in such great quantities that it stressed me out to even think about the photos I had to sort out! Slowly, but surely, I started to weed out my photos and emptied my SD cards to place them in files on different flashcards. I then, got into the habit of taking the photos off of my card right away and then creating a file on a flash drive for that photoshoot and deleting it off my card for more space. Christmas of 2018, I received the best gift of a hard drive from my aunt and it has changed my life ever since. Looking back, I wish I started out with a hard drive and just had all of my photos in one location. The thing I hate about flash drives is that it is so easy to fill up space! I would have about ten files on my drive and it would already be filled. This is my current routine for sorting through my photos and it has been so much easier for me to keep track of and organize my photos!
1: I get out my hard drive and I create a file name for the photoshoot.
2: I upload all of the unedited photos that I took and then from there, I open them in my editing platform (for me, its light room.)
3: I save my finals onto my desktop and add a file there for a backup method.
4: I airdrop/ send my finals to me and my model (if I have one) for that shoot.
5: I take that final folder that I made, and add that within my folder on my hard drive.
for example, I have a file named "Suburban Backyard" and then I click on that, see the 50 shots of unedited photos, then at the bottom I have another file of "finals" which has usually three different finals that I got out of the shoot.
This is just my way of sorting through my images and keeping myself organized! I know there are several different ways to do this and everyone is different, but I promise that it is so much easier to focus on the part that you enjoy, the actual shoot itself, than worrying about where you left your freaking photos!!
QUESTIONS TO ASK YOURSELF BEFORE SHOOTING:
-Does the purpose of this photo get taken away by the setting? -Does color matter compared to the color of the background/back drop? -Am I shooting outside? Did plan around the weather, and time of day it is? -Have you been to this location prior to shooting? It is important to check out all locations before doing a photoshoot for setting purposes and making sure your model is not thrown into a chaotic experience. |
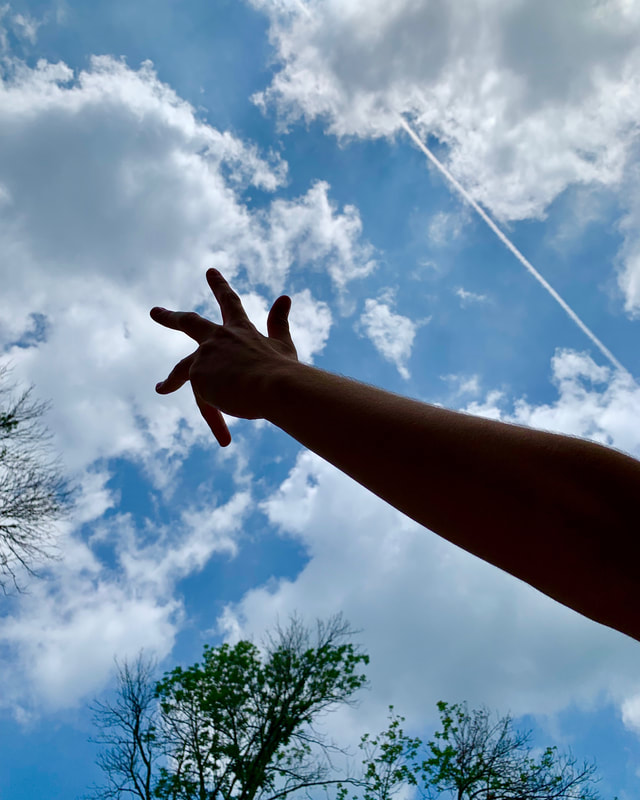
THE IMPACT OF THE BACKGROUND: This is something that I learned during one of the first projects I was given in my AP photography class. The assignment was know as the "anti-selfie," meaning that, unlike a selfie, this photo was to be a planned thought-out shot of yourself that resembled you. The photo to the left is the final product of that assignment! This was a crucial photo for my take off on my concentration, as well, because this was the photo where I learned my love for photographing hands. Back to the background, you can see that my lack of care for the background leads to distraction while looking at the photo. My thought process was that if I sat on the ground in my living room, I would be able to set up my tripod, get into position, and use my back door in the next room to see how all of my settings looked. I learned that even if I were to have shut the blinds completely, it would have impacted the photo! When planning your shoots, it is just as important to choose where the setting of the shot is! Do you want a clean-cut back drop with one color? Maybe an outside location that will change depending on time of day and weather? Whatever it is, make sure this is one aspect that is never overlooked and make sure that it only adds to the quality of your shot! |
PLANNING YOUR SHOTS:
I was very young when I decided that I wanted to be a photographer. I wanted to take photos of nature. Unfortunately, my high school did not have a huge art program and the photography aspect only consisted of one intro. level class. I took this class Sophomore year. The photography I was learning was more of a journalistic approach to our shots and I am grateful for the experience I got in that class; it led me to find my passion for the yearbook for the years after that! During my junior year, my high school got a new art teacher who completely changed the art program and made it flourish. this teacher brought AP photography to our school during my senior year and that has been the most influencial year that shaped me as the photographer that I am today. PLANNING MY SHOTS is something that I never did prior to this time, and it boggles my mind!! My AP photography teacher, and mentor still, taught me the beauty of planning!!!! Learning this skill will improve your photography tremendously and it is a skill that I wish I had sooner. It took me a long time to get my routine of planning a photoshoot, and I can finally confidently say that I plan every. single. shot that I take.
My method of planning consists of research. I want to learn about photography constantly. every chance I get, I look up old photographers I knew of and try to learn more about them. I collect different photography books ranging from artists, types of photography, and hacks! I write all of my thoughts down. I write every detail that I think of- these might be the most important aspects of the photo, or the parts that the viewer might not even pick up on. I find these notes important the day of the shoot when I am jittery and just excited to finally make the image in my head come to life. Start planning your shots and feel the reward once you get the outcome you were imaging in your head! If this is possible, start with a journal! it doesn't have to be a sketchbook or anything too large to create intimidation- but a small notepad that gives a designated space to write down your thoughts in a way that helps you plan and leave it all in there! keep the notes so when you look back, it is easy to find and it is interesting to see how much it helped the process as a whole!
